How to fly in bigscreen
Instructions on how to fly in bigscreen for standalone quest and PC
What “Flying” Means in Bigscreen
Flying means moving freely in any direction - including upwards - instead of being locked to the floor or using the standard teleport controls.
However, Bigscreen does not include a built-in fly button or native flight control. The ability to fly comes from external tools or modified versions of the app.
Important Warning for Behind users
Flying is a granted privilege, not an entitlement. Avoid flying in a disruptive manner (e.g. zooming around others, invading personal space, or causing annoyance), particularly in public areas such as the lobby. Misuse can result in revocation of flying privileges.
Method 1: Bigscreen Behind on Meta Quest
Recommended for most users, easiest method
Requirements
- A Meta Quest headset (Quest 2, Quest 3, or similar).
- Access to the built-in browser in your headset.
- A Bigscreen account.
Steps
- Put on your headset and open the browser application (often called “Meta Browser” or “Internet”).
- Navigate to bigscreenbehind.com (opens in a new tab).
- Follow the on-site instructions and video guide.
- Launch the modified version of Bigscreen and log in using your Bigscreen account credentials. Flying should now be available.
Method 2: PC+Behind
Harder than Method 1, easier than Method 3
Requirements
- Download & Install .NET Desktop Runtime (x64) (opens in a new tab)
- Download & Install Microsoft Visual C++ Redistributable (opens in a new tab)
Steps
- Download & Install MelonLoader (opens in a new tab)
- Choose Bigscreen Beta (disable nightly mods).
- Install version 0.7.0 or newer.
- Join the Behind Discord (https://discord.com/invite/7HWSSHPpBC (opens in a new tab)).
- Navigate to the #testers channel (you might have to obtain the tester-role) and check the pins; download the .dll.
- Place it in “Steam → steamapps → common → Bigscreen → Plugins”.
- Launch Bigscreen through Steam.
Additional Bigscreen Behind perks include sending private messages and friend list sorting, etc.
Method 3: PCVR; OVR
Recommended for PCVR users, advanced
The Playspace Mover feature (also known as Space Drag) in OVR Advanced Settings (officially titled OpenVR Advanced Settings) lets you temporarily shift or “drag” your virtual playspace in SteamVR applications, enabling movements such as climbing, adjusting height, reaching distant objects, or simulating free movement (often referred to as flying or noclipping).
The feature requires SteamVR and works best with PCVR setups (including Meta Quest linked via PC). It is not a native flying mode but an offset adjustment applied to the playspace center. Note: if you’re on a Quest headset, it’s recommended to combine this with Virtual Desktop.
Requirements
- SteamVR installed and running.
- OVR Advanced Settings installed. It is on Steam, and free from its GitHub page (opens in a new tab).
- A compatible VR headset and controllers (e.g., Valve Index, HTC Vive, Oculus Touch via link).
The application or game must run through SteamVR runtime (add launch option -vrmode openvr if needed for Oculus-native titles).
- Install and launch OVR Advanced Settings.
- Launch SteamVR (ensure your headset is connected and tracking).
- Put on your headset. OVR Advanced Settings adds an icon to the SteamVR dashboard (quick menu); click it to open the overlay dashboard, which appears as a floating panel in VR.
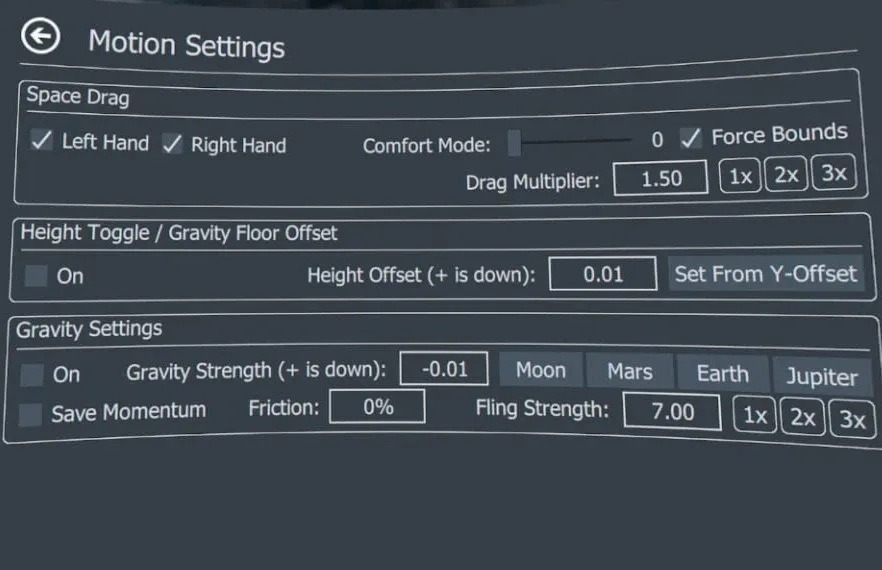
To enable Space Drag (Playspace Mover) in the Motion tab:
- Navigate to the Motion tab (often labeled with movement-related icons).
- Locate the Space Drag section (sometimes under headings like “Movement” or directly visible).
- Check the boxes for the hand(s) you wish to use: Left Hand and/or Right Hand (enable both for flexible climbing-style movement).
Optional recommended settings
- Comfort Mode: Enable and adjust the slider if rapid movement causes discomfort (it smooths transitions toward mini-teleports).
- Force Bounds: Enable to display chaperone boundaries during dragging (helps maintain awareness of real-world limits).
- Gravity: Enable if you want simulated gravity (useful for climbing/falling effects; toggle via bindings later).
- Fling Strength: Adjust to control how far/fast you move when “throwing” the controller.
Playspace Mover requires controller bindings to activate dragging.
To bind controls via the SteamVR input system:
- In SteamVR (desktop window or dashboard), go to Devices > Controller Settings (or access via OVR dashboard > Bindings tab).
- Select Edit Controller Bindings (enable “Show old binding UI” if using newer SteamVR versions).
- Choose your application (e.g., VRChat, All Applications, or the specific game). For broad compatibility, use All Applications or add per-game bindings.
In the bindings editor:
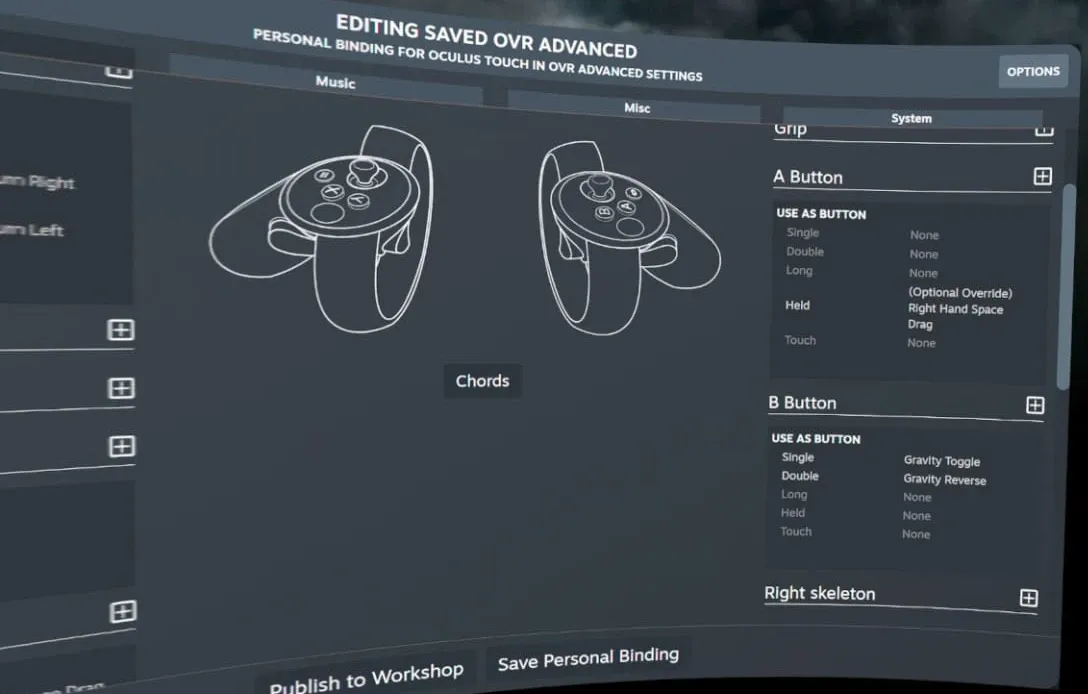
- Search for actions under the Motion category: Left Hand Space Drag (or Right Hand Space Drag). Optional: Gravity Toggle, Height Toggle, Reset Offsets.
- Assign a button or hold action (common choices):
- Grip button (hold to drag).
- Trigger (hold).
- A/B or X/Y buttons (hold or press).
- For override versions (e.g., simultaneous hand use), bind (Optional Override) Left/Right Hand Space Drag.
- Bind Reset Offsets (double-tap same button) to return to original position quickly.
- Save bindings and apply.
To use Playspace Mover in VR:
- Launch your SteamVR application or game.
- With OVR running, perform the bound action (e.g., hold grip on selected hand). While holding:
- Move your controller in any direction - the world shifts relative to your hand (you “drag” yourself through the environment).
- Rotate your wrist/controller to turn the playspace (if Space Turn is enabled in Rotation tab).
- Combine hands for climbing (pull with one, push with the other).
- Release the button to stop movement.
- To reset: use your bound reset action or toggle offsets off in the Motion tab.
Additional Notes and Tips
- Compatibility: Works in most SteamVR titles; some require “Allow while seated” or specific runtime flags.
- Gravity and Height: Toggle gravity for realistic falling/climbing; use height toggle for quick seated/standing switches.
Troubleshooting
- No movement: Verify bindings are active for the current app, SteamVR is running, and hands are enabled in Motion tab.
- Laggy movement: Disable “use frame update” legacy option if present (modern versions optimize differently).
- Only works in SteamVR Home: Re-bind per-application or use “All Applications.”
- Best Practices: Practice in a safe, open virtual space first. Avoid excessive use in public multiplayer environments to prevent disruption.
This functionality provides flexible playspace manipulation without additional hardware. For the most current details, consult the official GitHub repository or Steam Community guides, as minor interface changes may occur with updates.
Final note: there are multiple ways to set this up as you like it. Google “VR Playspace mover OVR” on YouTube for video guides and different setups.
Below you’ll find example settings and bindings.